Do you remember being a kid, and having that feeling right before an important event or holiday, when you go to bed and know there’s no chance you’re going to be able to sleep? It’s that insatiable sensation of joy and excitement. I’m that kid the night before, but on Halloween (edit: actually, for the entire month of October).
I don’t know what it is about this holiday, or rather “season” which it has become; but I feel an undeniable connection with Halloween. Perhaps, my passion/borderline genetic relation to Halloween spurs from the outrageous Halloween parties that my parents would throw for my friends and their parents when we were children. My wonderful Uncle Russell would dress up as a witch, and get up on our roof with a cauldron full of dry ice. He would recite a chant to kick off the party with a graveyard bone hunt my Mom set up with fake tomb stones she created.
Or, maybe, I’m a Halloween fanatic because my parents introduced me to the Nightmare Before Christmas when I was only five years old—not really a “cheery” choice for children, but it certainly left an impression on my little mind for the rest of my life. Regardless, Halloween has become a holiday instilling the adult version of child-like wonderment in me; and as a make-up artist, it’s the one day of the year I can let my imagination frolic the streets (or social media) with whatever pretty, funny, cute, or twisted idea my visions have conjured.
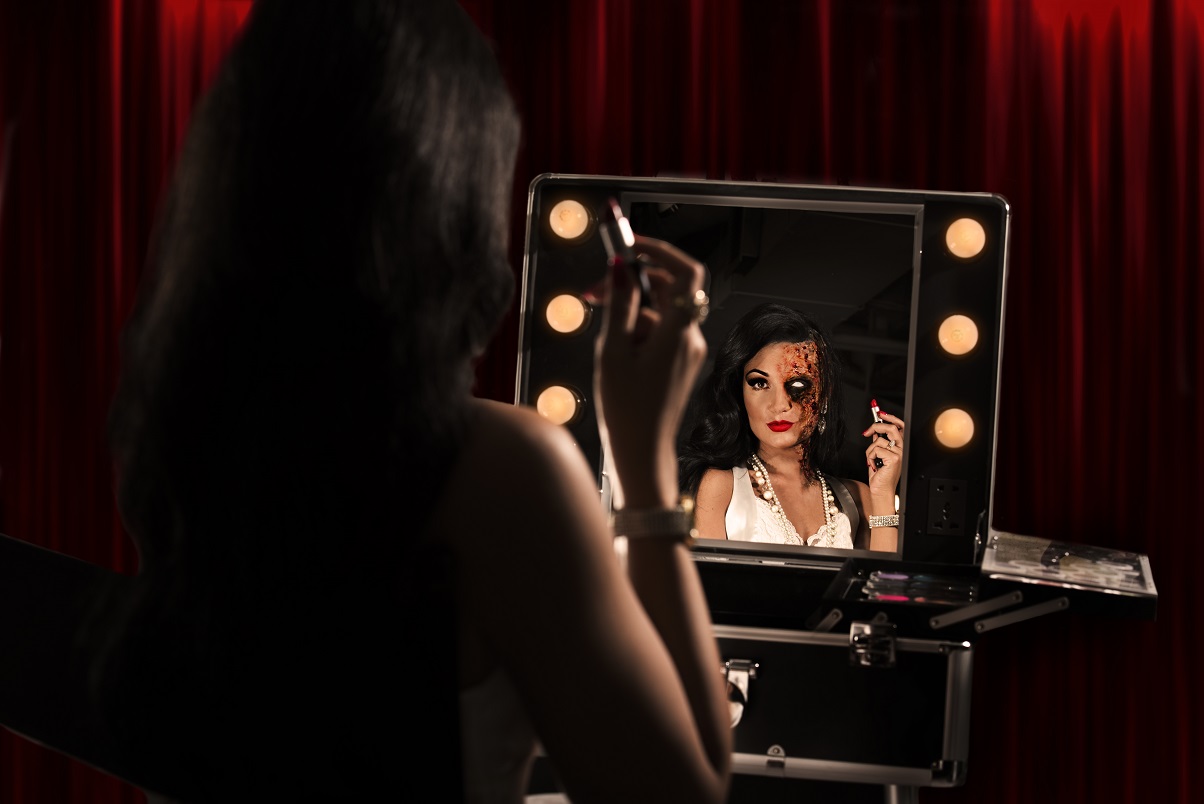
Every year, I like to bring one of these visions to life with a video production and photo shoot. I had initially thought of the idea to create a burn victim when wrapping up last year’s creative, however only decided weeks before the shoot what kind of special effects make-up I wanted to pull off.
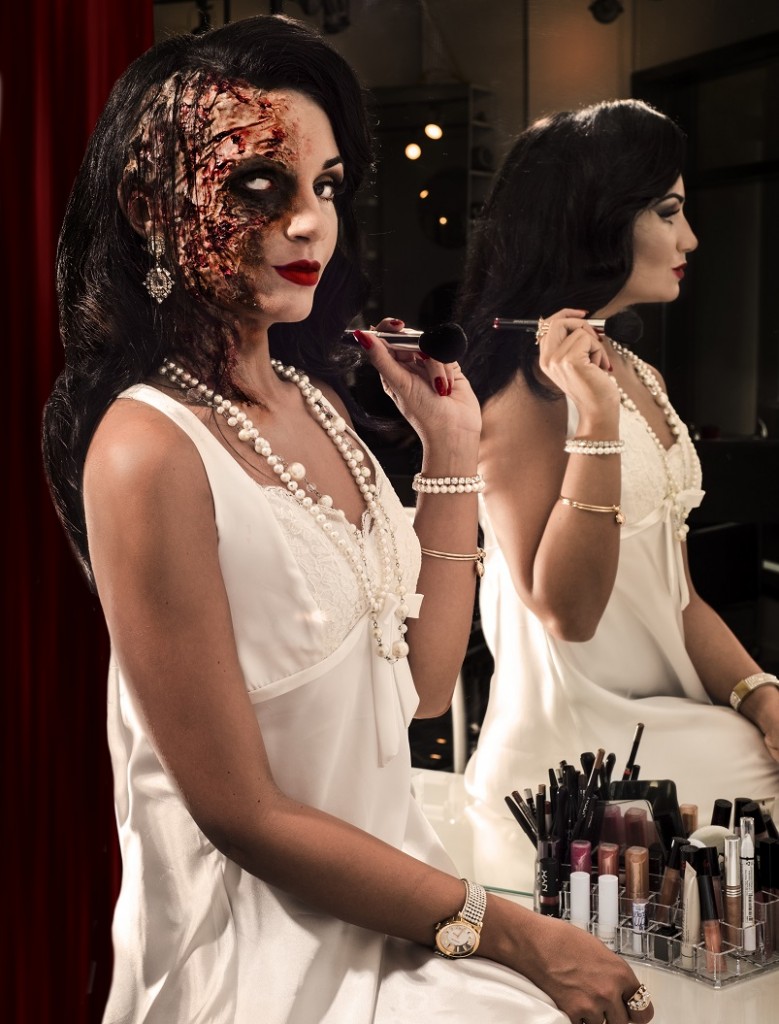
If you are in a pinch for something simple to do this Halloween and want something with a bit of glam and gore, here is how you can recreate this special effects look (see also the step-by-step guide below).
Step-by-step guide
1) Pin a portion of the hair down flat against your head.
2) Pin a cut up bald cap over pinned down section of hair, and adhere overhanging part of bald cap onto forehead with a thin layer of spirit gum (remember to tap the spirit gum to remove noxious fumes and activate the adhesive before placing down the bald cap).
3) Melt about a half dozen gelatin cubes (you may need more or less depending on the size of the area you are covering, but they are inexpensive!) in the microwave until gelatin is completely fluid. Be careful to not overhead gelatin, it melts VERY quickly and gets VERY hot.
4) With a spoon, spoon out gelatin and smear all over bald cap and rest of the face where you would like to create “the burn effect” (avoiding your eyes, of course!). Move the edge of the spoon around in various patterns to create texture to “the wound”, while the gelatin is drying. Don’t be afraid to get gelatin in your hair to cover up the pins holding down the bald cap—it removes easily with hot water in the shower.
5) Pick holes in the gelatin “burn effect” with tweezers to create the illusion of popped burn blisters and sores.
6) Powder the entire gelatin area to take away stickiness.
7) Cover the entire gelatin area and rest of your face with foundation.
8) Place bright red grease paint, lipstick, water-activated paint, or cream paint of your choice in the deepest parts of the gelatin ridges and exposed skin/blister areas you picked with your tweezers. Use your finger in tapping motions to haphazardly blend out the red while paint is still wet.
9) Dust lots of brown eye shadow around the entire gelatin area using a fan brush.
10) Dust only the highest ridges of gelatin with black eye shadow, using a fan brush to create an extra crispy, blackened “burn” effect. Take a regular eye shadow brush and cover entire eye area with a haphazard application of black eyeshadow.
11) Add fake blood to the deepest parts of the gelatin ridges—blend some spots out with finger, pour on extra fake blood in other spots and let it drip.
12) Add a personal lubricant to certain spots to make them look really wet, oozy and raw.
13) Option: Glue on bits of hair cut out from extensions using spirit gum and blending out the adhered ends by adding a bit of gelatin around the base. Cover up with more foundation and apply more colouring from the above steps if needed.
14) Apply any kind of beauty make-up to any exposed, “normal” skin. We went with a traditional glam look and red lip—you could do anything you want, the sky is the limit!
**to remove gelatin if it is in your hair, I suggest showering with the entire piece attached to let the gelatin melt off to expose the bobby pins. Once gelatin is melted off and bobby pins are exposed, the bald cap can be removed with any remaining gelatin and paint on it.
Please hashtag #FajoHalloween and #AmyBurns if you try to replicate this look—we’d love to see your recreations!
Have a fun and happy Halloween, everyone!
Full credits
Written by: Amy Pigeon
Make-up artist, producing, directing/art directing and styling: Amy Pigeon,
www.amypigeonmakeupartist.com, @amypigeon_mua
Cinematography, video editing, visual effects and sound design: Mark Cannataro,
www.markcannataro.com, @markcannataro
Hair styling and design: Chelsea Collinson, www.chelseacollinson.com, @seenbseen
“Burn victim” model: Amanda Clarke
Set: Room1Six salon, www.room1six.com, @room1six
Photography: Kareen Mallon, FAJO’s Senior Photographer
https://www.facebook.com/ElectrafireStudios, @electrafire
Creative piece music: Youtube Audio Library, Doll Dancing by Puddle of Infinity
Time-lapse music: Daruma Sounds, Daysan by Aska
https://soundcloud.com/darumasounds/aska-daysan


[…] more inspirations, check out our Halloween 2015 and Halloween 2016 […]